What is the Main OCR in the Mission?

Objectives
- Navigation room: Encountered an X Specimen
- Data Room: To get the new weapon, the Missile.
- Defeat the unknown dangers in that sector (X Infected Boss)
- Take Elevator 2 and Check SRX Section (Diverts to new mission)
- Clear 5 Atmospheric Stabilizers (X Infected Boss V2)
- Manage Energy bars.
- Optional – Find Collectibles
Challenges
Players face the following challenges while managing their energy and weapons by progressing further thru different platforming abilities.
Navigation Room: Player is trained of basic shooting mechanics.
- Specimen – Tutorial to basic enemies on how they attack and what they reward, player just needs to shoot to kill them.
Data Room: Player comes into concept of basic enemy patterns.
- Reviving Infected – Following the specimen player is now introduced of these enemies where they keep respawning in 3-4 seconds, maintaining the difficulty of the area.
- X Mutated Door – Whenever it opens its eye lids, it shoots. Player can only damage it by shooting when it reveals it eye-ball.
- X Boss – Has the ability to transform into a big armored alien. In the normal form, damages player by colliding and while in armor form if can spit fire and release a shock-wave from its hand damaging the player.
Atmospheric Stabilizers: Player is shown various types of enemies, and now these enemies are combined with executing basic platforming skills at the same time, making the level hard overall.
- Small Green Aliens – They charge at the player to damage.
- Big Green Alien – It feels like a combination of small green aliens but it doesn’t do anything different from the small ones, it just charges at the player for damage.
- Armored one-eyed Aliens – These stay in one place and keep stomping the area, they act as path blockers so player has to dodge through them. Player cannot damage it directly and can only damage it while it’s elevating up and it can only be attacked at its bottom area.
- Charging Enemies – Charges like a wild boar and can only be damaged by shooting in its back.
- Climbing Enemies – They are seen climbing at walls, they have the ability to shoot a beam and jump across to the other wall. Both abilities damage the player.
- Infected Crabs – These enemies can stay climbed or on ground. They have limited movement, and they can shoot pathed projectiles which damage player on collision.
- Infected Frog – Has the ability to shoot and maneuvers around by jumping.
- Lava – Red water type, damages overtime.
- X Boss V2 – Red Colored, similar to the previous boss but cannot transform. But it has the ability to target shoot the player to damage.
Platforming Progression
Player learns basic platforming actions from the first two objectives then the game combines complex platforming skills with different enemies. Below is the learning order for different platforming actions.
- Jumping – In first objective, by trying to figure out the controls.
- Ledge Jumping – Basic platforming skill from jumping.
- Morph Ball – After this ability is gained, player faces complex platforming actions. Eg; shooting in a small space reachable by only morph ball, player has to use jumping, ledge jumping, shooting and morph ball ability to progress through.
- Climbing – After 2nd Objective, with the basic enemy patterns, player will have to use all the platforming abilities learned.
- Destructible – The player has to shoot to gain access to some places, and this is usually combined with other platforming actions.
Collectible Routes – Mostly are easy to find as they are placed in main objective path, and they require little to no platforming as player just needs to realize they are there in the map.
Rewards
- Navigation Room: X Health Regen Yellow, restores energy of the player.
- Data Room: Missiles, limited Projectile type but deal more damage.
- X Mutated Door: X Regen Red, restores weapons tank and health. Energy Tanks, increase the tank limit.
- X Boss: Ability Morph Ball, ability to morph into a ball to crawl into unreachable places. X Regen Green, increased energy and weapons regen.
- Atmospheric Stabilizers: Energy Tanks, Missile Tanks.
- X Boss V2: Charged Beams, increased attacks range and can now charge bullets firing.
What are the situations in play and how are they related to the containers? How is the difficulty controlled? and what makes the situation different from each other?
Similarities: Mostly all of stabilizers look-alike and they can only be damaged by special ammo, they also have similar movement pattern.
Differences:
1st Stabilizer: Hovers up and down with no enemies around. Player can shoot it easily just by standing at one point.
2nd Stabilizer: The area contains some Infected Frogs and this time the stabilizer hovers left to right and this time also player can shoot it by standing at one point.
3rd Stabilizer: This area also contains some infected frogs and now the stabilizer hovers up and down but is situated in such a way that player has to climb to reach to it, and player has to shoot from a hanging position.
4th Stabilizer: The difficulty here spikes up as player has to destroy the stabilizer while enemies are attacking. And player can only destroy it by charging the weapon and colliding it with the stabilizer.
5th Stabilizer (X Boss V2): As explained in the challenge section, this boss is quite easy compared to what the player has managed to achieve to get till here. With that said, the process of reaching to this boss is quite tricky and it takes combined knowledge of different skills to kill the boss, that’s maintaining the difficulty in this phase.
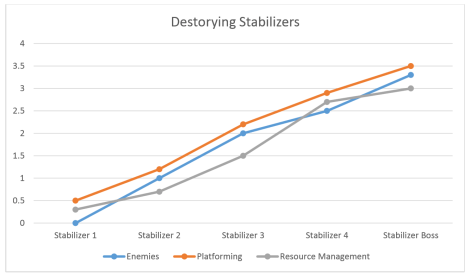
Difficulty Curve
I have made this curve on the basis of 3 core elements of the game, enemies, platforming, and resource management. Enemies stating how many enemies are there? How difficult are they to kill? Platforming meaning, difficult to reach a certain point? Require to maneuver around to dodge enemies? Resource Management, Do you want to use your missiles now? Keeping your health up by collecting Regens.
And this curve compares the elements explained above of all the 5 Stabilizer areas. The curve states how the difficulty raises in these areas. You can see in the how different actions performed by player are compared.